I have many fond memories growing up of being in my Baba's kitchen and making banana bread. It was always so moist and so delicious that you hated waiting until there were enough bananas in the freezer to make a few loaves. I was thrilled when after I got married and had Brayden that my Baba passed the recipe to me. I am sharing it with you all since this is such a comfort food that anyone should be able to make and enjoy with their family.
It has been a while since I made banana bread because I could not get ungassed bananas for Rylan. All bananas in the stores are gassed and that gas is made from corn so Ry reacted to all bananas. My local Sobey's is able to order in ungassed bananas for us and not only does Ry get to enjoy banana's but he gets to help Mom make banana bread.
Baba's Banana Bread
2 cups flour
1/2 tsp baking soda
2 tsp baking powder
3/4 tsp sea salt
1/2 cup sugar
1 egg beaten
1/4 cup coconut oil
1 cup mashed bananas
Mix together the dry ingredients. In a separate bowl mix together the wet ingredients. Add the dry ingredients to the wet ingredients and mix well. Pour into a greased pan and bake at 350 F for 1 hour.
My boys love homemade pizza and I needed to make a pizza sauce that was not to overpowering but had lots of taste. This sauce is great for pizza or for dipping garlic bread. It is super easy to make and once canned will last you a while.
Spicy Garlic Marinara Sauce
5lbs tomatos
1/4 cup minced garlic
1 tsp dried chili flakes
3 tbsp. sugar
3 tbsp. sea salt
1 cup fresh basil
1/4 cup fresh parsley
Chop and peel tomatos and place in a large pot. Add garlic, chili flakes, sugar and salt. Bring to a boil and reduce the heat. Simmer for 1 hour or until the right thickness is reached. Remove from the heat and add the basil and parsley. Water bath can.
Enjoy
One huge challenge that someone with a corn allergy faces is trying to find a corn free probiotic. So many with this allergy are trying to heal their guts and probiotics are a huge part of that. To my knowledge there is no 100% corn free probiotic available.
So to get natural cultures without the worry of corn I started fermenting veggies for Kevin. Fermentation of food has been used for hundreds of years and is a way to really make a happy gut.
Fermented Veggies
2 1 quart jars
4 cups water
2 tbsp. sea salt
chopped veggies to fill the jars
seasonings of choice
Layer the chopped veggies into the jars. Add your choice of seasonings. Dissolve the salt in the water and our the water into the jars. Close the jars and let sit in a dark space for 2-3 days. On day three crack open the lids and allow some air to escape. Do this every day for another 4-5 days. Taste veggies - if you want them stronger then leave them to sit longer.
Be sure to start off slow to let your stomach get used to the fermented foods!!
I am always on the search for foods that are quick to make and travel well. I find that dehydrated snacks are one way to create a good supply of food for travel on the road as well as making snacks that can be store in case the power goes out or we need to evacuate our home quickly.
I do not want to think those things would ever happen but with food allergies you always need to be prepared for those situations. If we did have to leave our home quickly for an extended time I always have this fear that Ry and Kevin will go hungry. Having canned foods and dehydrated foods on hand takes many of those fears away.
These crisps are super easy to make, taste great and can be vacuum sealed in bags for easy storage.
Apple Cinnamon Oat Crisps
1 cup oats
2 apples peeled and sliced
1/4 cup sugar
1 tsp cinnamon
Cook the oats as directed on the package. Place the apples, sugar and cinnamon in the food processor and pulse until chopped. Add the cooked oats and pulse until a paste forms. Spread the mixture on lines dehydrator sheets spreading to cracker thinness. Dehydrate 6-8 hours. Flip the sheets off and chop the crisps into cracker size and dehydrate for another 2 hours. Enjoy!!
We are very fortunate that Kevin and the boys love to fish and are even more fortunate that we live across the street from a beautiful lake. In the summer months my boys fish almost daily to catch food for us since it is the only fish Ry and Kevin can tolerate. It is really easy to get tired of eating fish the same old way so I decided to try some new techniques.
I make beef jerky all the time and figured that fish jerky would be just as easy. Not only was it easy to do but it was great. I vacuum sealed some so that Kevin has the perfect quad trip snack.
Cajun Fish Jerky
3-4 fish fillets, deboned
2 tbsp. paprika
2 tsp sugar
1 tsp sea salt
1/2 tsp ginger
2 tsp dry mustard
1/2 tsp all spice
Slice the fish into strips and mix in with all the spices. Let sit in the marinade for 15 minutes to 1 hour. Lay the fish on baking sheets and bake at 350 F for 8 minutes. Transfer the strips to the dehydrator and dehydrate for 6-8 hours. It should be the consistency of regular jerky.
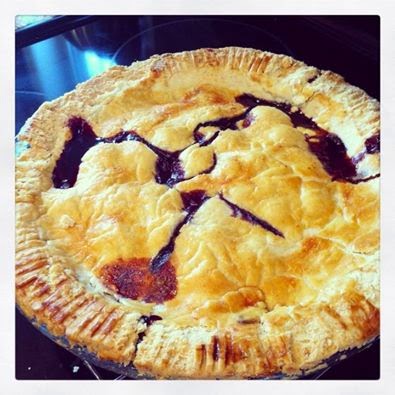
Today was one of those mornings that started off pretty gloomy - overcast and windy. We needed something to cheer us up so I decided to do some baking. I asked everyone what they wanted - Bray said Banana Bread, Ry wanted applesauce and Kevin wanted a cherry pie. It has been a really long time since I made a pie and I figured that it would be an awesome treat. We have 36 lbs of pitted and frozen BC cherries in the freezer so I went for it.
The pie was quick to make and so very tasty. It was also the first time that Ry got to eat pie. He took a bite, smiled and said yummy and then proceeded to eat a huge slice. Nothing warms your heart more then seeing that little guy try a food for the first time and love it.
Oh My Sweet Cherry Pie
Pie Crust :
1 1/2 cups flour
1/2 cup coconut oil (firm)
1/2 tsp sea salt
8 tbsp. cold water
Mix the flour and salt together. Cut in the coconut oil with a knife until the mixture is crumbly. Add the water until a dough forms. Refrigerate for about 2 minutes to firm up but no longer as the coconut oil will solidify. Once firm roll out on a floured surface and put into the pie plate.
I make the recipe twice to make the top layer and the bottom layer.
Pie:
4 cups thawed/fresh pitted cherries
1/2 cup sugar
1 tbsp. tapioca starch
2 tsp lemon juice
Mix all the ingredients together and pour into the pie plate. Top with the other pie crust and pinch the edges together. Brush the top with a beaten egg. Wrap the edges with foil and bake at 375 F for 30 minutes. Remove the foil and bake for another 40 minutes. Let cool on a wire rack.
Kevin has many childhood memories of eating canned pears and peaches. He loved them but his body did not love all the sugar that was in each jar. I have to say that I stayed away from canning fruit because I did not want to have to eat all that sugar. While it is hard to find corn free sugar even when we have too much sugar messes up Kevin and my non allergic boy Brayden.
I was getting tired of always freezing the fruit and really wanted a way to preserve it so that it could travel with us and even withstand a power outage if we ever got one. I had seen many recipes about canning and using honey. We do not have safe honey and no leads on getting any. In many recipes that I make I had been subbing honey with coconut nectar ( a natural low glycemic sweetner). I figured it should work for canning as well.
The first batch I did was nectarines and they turned out so delicious that every one was fighting over them. My next attempt was doing it with mangos and they tasted awesome as well. It is actually really simple to do and gives us a supply of food that travels easy.
Canning Fruit Without Sugar
Your fruit of choice - peeled and sliced
5 cups water
1/3 cup coconut nectar
lemons
Peel and slice the fruit and pack into your jars. Mix 5 cups of warm water with 1/3 cup of the coconut nectar. Add a tsp of lemon juice to each jar to maintain color. Add the water mixture to each jar ensuring 1" of headspace. Seal the jars loosely and then water bath can for 20 minutes. Once the lids of popped, tighen and store.
I find it pretty ironic that each week I can a dozen or more jars of apple sauce given that I do not even eat it. A bad experience with the sauce and my wisdom teeth getting removed as left a complete distaste for it. While I may not enjoy it any longer it is a staple in the diets of both Ry and Kevin. It is used to administer meds, mixed with hemp hearts for a snack or used in baking. It travels well and is always a good snack to have on hand.
It is also super easy to make and I highly recommend if you have safe apples to make apple sauce.
Apple Sauce
20-25 gala apples (or whatever your safe apples are), peeled and cored and sliced
1/2 cup water
* you can add cinnamon or other spices to change up the flavour
Place the water and the chopped apples into a pot and simmer for 30 minutes or until the apples are soft. Pour into jars and water bath can. You can add lemon juice to each jar to keep color but ours never lasts long enough.
Last year I canned 86 jars of tomato sauce and I ran out before the new season began. My goal this year is 100 jars. We use a lot of tomato sauce - meat sauce, baked spaghetti, soup base and more. This recipe is as about as basic as it gets for canning tomato sauce and can be the step stone for dozens of other uses. I add tomato paste to make spaghetti sauce, coconut oil and flour to make baked spaghetti and use it straight out of the jar for the bases of lots of soups and some lentil stews.
It may seem like a lot of tomatoes to can for ones year but when you can get safe tomatoes and not a lot of other safe veggies you go with it. You find recipes that use tomatoes.
Basic Tomato Recipe
Chopped tomatoes to fill a large pot
1 cup of water
Seasonings (I add some oregano and basil and salt and pepper to mine)
Place the water in a pot and add the chopped tomatoes and the seasonings. Let the tomatoes simmer for about 25-30 minutes. For a chunky sauce pour into jars as is and water bath can. For a smoother sauce, puree with immersion blender and then can.
Once you are ready to use the sauce you can add whatever you want to it.
I
remember coming home from the dietician after discovering that Ry was allergic to corn and having a list in my hands of things to take out of his diet. The list was pretty small compared to what I now know but I remember seeing ketchup on the list and wanting to cry.
All I could think of was why on earth should there be corn in ketchup. Research revealed that good ole white vinegar was made from corn.
I am not sure why I panicked at the thought that Ry might not be able to have ketchup but it really made me sad and scared. Ketchup is something I grew up with, something little kids love licking off their plates and just pairs so perfectly with potatos!! There was only one solution - learn to make my own.
I was surprised at how easy it was to make and how much better it actually tastes. Now seeing Ry have homemade fries with ketchup brings such a warm feeling to my heart.
Super Simple Ketchup
6oz tomato paste
1 tbsp. sugar
2 tbsp. coconut vinegar
1 tsp sea salt
1 cup water
1 tsp garlic (dehydrated powder)
1 tsp onion powder (dehydrated myself)
1/2 tsp allspice
2 tsps. molasses
Place all the ingredients in a pot and whisk together. Simmer over medium heat until the ketchup thickens up. If using right away put in a jar in the fridge.
I usually make a triple batch and water bath can afterwards to always have some on hand. It is a great base for BBQ sauce or baked beans.